


Bridge that Gap challenge
A big storm has washed away part of the main road near your school. A child in the school is very ill, and the ambulance can’t get through. We need your help - can you design and build a bridge that can carry the ambulance across the big gap in the road?
Levels of difficulty:
Level 1 - Make a bridge which will span a 1m gap without supports
Level 2 - Make a bridge which will span a 2m gap without supports
Level 3 - As level 2, and will also support the weight of a box of K’NEX in the middle
Equipment: Large K’NEX set.
Approach: K’NEX is superb for building bridges, provided you get the design right. Think about how you can make your bridge really strong.
Try out your ideas in a short bridge, and test it between two tables. Does it break or sag in the middle? If so, how could you strengthen it? Push down on the centre of the bridge - does it start to fail in any way? How can you prevent this? Don’t be afraid to start again after you have tested your bridge - getting the best design is not easy.
When you are happy with your short bridge, extend it to 1 metre long, and test it again. Can you improve your design even further? Finally extend the bridge to 2 metres, and test it. If it stands up OK, try adding books to the centre one at a time (carefully!). If the bridge starts to bend or break - back to the drawing board!
Handy Hints (please click to view):
A2 - 3 ways to connect K'NEX rods and connectors
A5 - Strong 3-D structures
Teachers' Notes
Helps pupils learn how to make structures more stable and withstand greater loads; how structures can fail when loaded; and techniques for reinforcing and strengthening them.
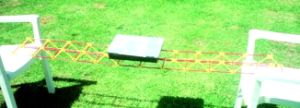
Possible solution: See photo.
Before starting: Look at pictures of different types of bridge, and consider which might work best with K’NEX.
Conclusion: Firstly, ask the children what they have learnt in the process of completing the challenge. Then ask them to compare the different bridges built by the class, and assess the strengths and weaknesses of each.
Copyright © Andy Shercliff 1996 and K'NEX User Group 2004
![]()
![]()
![]()
![]()
![]()
Website last updated 20 Februrary 2026. Feedback ![]() 99% positive over last 12 months (3,000+ orders) More...
99% positive over last 12 months (3,000+ orders) More...